
|
|
|
#1
 05-01-2017, 05:50 PM
|
|||
|
|||
|
Hi,
I'm getting towards being able to make a start on my old 2nd gen Hilux Surf (known as a 4Runner in the US) project. For a 25 year old vehicle, it's remarkably rust free, with the exception of the rear arches. I've sourced an arch repair panel for each side from Japan (via Canada!), but I was wondering what the best way to approach it would be. Access to hold a dolly behind the replacement arch section for planishing is limited. Would cutting off the outer quarter panel where I've indicated, so that I can do the welding at the bench, be sensible, or is it just making more work for myself? 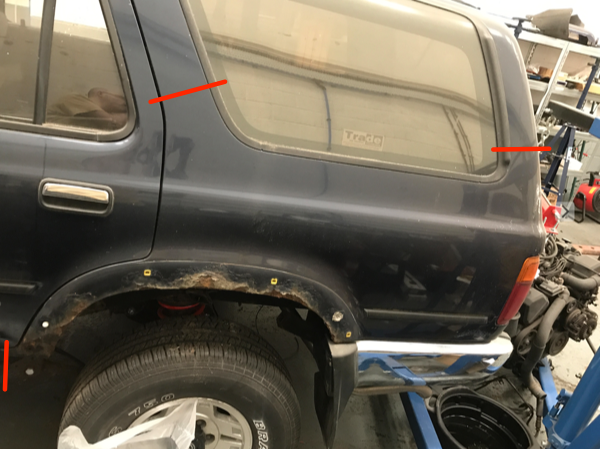 Thanks! 
|
|
#2
05-01-2017, 08:23 PM
|
|||
|
|||
|
General trivia about 4Runner/Hilux Surf 2nd generation bodies like these that you may or may not know-
The either zero or significant rust found in this area of the bodies is apparently more related to issues with factory corrosion-proofing or lack thereof than to normal use & resulting rust. We have three of these 2nd generation 4Runners here and have looked at many, many, many more here in the southeastern USA where the vehicles are not exposed to significant road salt and have fewer rust problems. It doesn't seem to matter what year model- it occurs on early and late ones. As a general rule, they either have no rust or the forward portion of the rear wheel arch is very heavily rusted out, even completely gone between the door and wheel well. The rust is often surprisingly equal if not identical on each side of the vehicle. The rest of the body will generally be essentially rust free. The rust is usually from the inside with the factory paint intact. It may be a drainage issue causing this problem but this is an area where nothing should be getting wet inside the panels. The rust travels up the doorpost between door and side window quickly, even after there are big new drainage/rust holes in the bottom of the panel. Not certain what is the reason, but it is a fact with these bodies. Cutting away to solid metal is obviously normal procedure. In this case, you may want to pay even more attention to any color changes that may indicate present or missing corrosion proofing from factory. The lower cut line on rocker panel you show in the pic might be better placed if moved forward to make sure you're into good metal. I have not done this repair yet but have a spare 1990 4Runner 22re 5 speed here that needs the same exact repair when and if I get time to do it..... Hope this helps. Good luck with your project. I will be interested in how it turns out..
__________________
AC Button II http://CarolinaSculptureStudio.com https://www.youtube.com/channel/UCzSYaYdis55gE-vqifzjA6A Carolina Sculpture Studio Channel
|
|
#3
05-01-2017, 09:40 PM
|
|||
|
|||
|
Been there, done that darn near a thousand times, maybe more. I wouldnt even get involved with the job unless you also had a outer wheelhouse and you might as well get a trunk floor skirt if its still available. The trunk floor skirt can usually be patched easily but patching the outer wheelhouse can be very time consuming
 making it fit correctly to the quarter. ~ John Buchtenkirch making it fit correctly to the quarter. ~ John Buchtenkirch
__________________
John
|
|
#4
05-02-2017, 02:28 AM
|
|||
|
|||
|
Quote:
This will be a bit of a labour of love, as it was my first ever truck. That, and I've got a 1UZFE V8 to drop into it  Quote:
|
|
#5
05-02-2017, 12:16 PM
|
|||
|
|||
|
Having done a few of these closed panel jobs leads me to avoid welding the outer seams.
Instead, I joggle / step / offset the existing panel edge about 3/4" in - and down. I then make up the patch and fit it flush in place and cleco it. I use my shop-made 7inch vise-grip dimple-maker to prep for my closed-end flush pop-rivets. I tin the two mating faces and clean properly and install rivets. At the panel ends I bung in two brazed spots to tie them tightly, and then solder up the works real nice. (ps, does not work so great on aluminum jobs....  ) )
__________________
Kent http://www.tinmantech.com "All it takes is a little practical experience to blow the he!! out of a perfectly good theory." --- Lloyd Rosenquist, charter member AWS, 1919.
|
|
#6
05-02-2017, 02:59 PM
|
|||
|
|||
|
Hi Dan,
How big is the repair panel, can you show it on the car?
__________________
Cheers Martin No matter how clever you think you are, stupidity is always one step ahead!!!!
|
|
#7
05-02-2017, 04:03 PM
|
|||
|
|||
|
Quote:
|
|
#8
05-02-2017, 04:18 PM
|
|||
|
|||
|
Hi Martin,
Quote:
 Thanks!
|
|
#9
05-02-2017, 11:43 PM
|
|||
|
|||
|
Quote:
In aviation, spot welds have been shown not to be as strong as rivets..... so in some repairs the spot welds are replaced by rivets - but these joints are without the additional bond strength of a 3/4 inch wide lapped solder seam...... 
__________________
Kent http://www.tinmantech.com "All it takes is a little practical experience to blow the he!! out of a perfectly good theory." --- Lloyd Rosenquist, charter member AWS, 1919.
|
|
#10
05-03-2017, 06:57 AM
|
||||
|
||||
|
I've always cut the old arch out repaired the inner, then welded the new outer on with a bead of urethane along the last edge before the lip, then spot weld through the sealer while its wet. had lots of practice coming from sheffield uk lol
__________________
Neil
|
 |
| Thread Tools | Search this Thread |
| Display Modes | |
|
|


 Linear Mode

