
|
|
|
#1
 10-24-2012, 09:58 PM
|
|||
|
|||
|
Hello,
I'm Austin Hunt as the handle suggests and I have no experience forming. I live in Fairbanks Alaska and dont do much aside from earning and engineering degree and working on my Graham Brothers Truck. I would like to pick up some knowledge to help metal finish my dented panels and form some rear fenders. I have no tools and cant afford a wheel or bead roller. So any info on hand-made hand-tools or input on what is essential to those with experience would be interesting. I recently bought a dvd from David (metalshapingzone.com) and intend to study up. Unfortunately I will be moslty a silent onlooker or question-asker for a while until I get something under my belt.
__________________
Austin Hunt 
|
|
#2
10-24-2012, 10:25 PM
|
||||
|
||||
|
Austin, welcome and thanks for the introduction. Hope you enjoy the site and find it helpful. Lots of good information here if you read a lot of the threads. Thanks for joining us.
__________________
Joe Hartson There is more than one way to go to town and they are all correct.
|
|
#3
10-24-2012, 10:41 PM
|
|||
|
|||
|
Thanks! Any suggestions to favorite threads are appreciated also.
__________________
Austin Hunt
|
|
#4
10-24-2012, 11:04 PM
|
|||
|
|||
|
HI Austin welcome to the forum
Peter PS how cold will it get in winter in Alaska reason for asking is because we always complain that it's to cold to work here in Australia maybe I am getting to old 
__________________
P.Tommasini Metalshaping tools and dvds www.handbuilt.net.au Metalshaping clip on youtube http://www.youtube.com/watch?v=WEAh91hodPg Making Monaro Quarter panel: http://www.youtube.com/watch?v=KIpOhz0uGRM
|
|
#6
10-25-2012, 11:27 AM
|
|||
|
|||
|
Quote:
Welcome to the forum and to the craft. Have you looked carefully thru the index? http://allmetalshaping.com/index.php I would suggest: Basic Questions and Answers, and Basic Tools as starting points. Any thread with a Sticky bears extra attention as well. This thread: http://allmetalshaping.com/showthread.php?t=1706 proves you don't need a lot of sophisticated tools to get started. The link below was posted recently in the above thread and is noted for its clarity in getting a concept across. I might add that watching the other videos by the same youtube poster is worthwhile. https://www.youtube.com/watch?featur...&v=tQCS3KCpNJY You have a most excellent tool already in David's video. His "stump" also proves you don't need as large a chunk of tree as many think. As far as removing fender dents goes, an oversimplification of collision repair, but a basic rule of thumb is: "Last in, first out". That often but not always, means start on the outer edges and work your way into the initial strike area. A few clicks away and you can start reading some basics on page 30 (and following) in this old manual, great illustrations of on-dolly work vs. off-dolly, and of sequencing your actions: http://www.hnsa.org/doc/pdf/metal-body-repair.pdf If you want to spend a couple dollars, get Frank Sargent's metal bumping book, there's a reason it's been in print since 1953: http://www.amazon.com/Bumping-Instru...+metal+bumping Hope this helps, Mark
__________________
Mark from Illinois Last edited by weldtoride; 10-25-2012 at 11:35 AM. Reason: added info
|
|
#7
10-25-2012, 11:59 AM
|
|||
|
|||
|
Peter Tommasini - Well... it was -15 F (-26 C) yesterday and by Christmas it will be -40 F (-40 C also) or worse at least a couple times a month. last year it was -30 for an entire month! Working in it is terrible but living isn't that bad.
HEATNBEAT - Thank you. Weldtoride - Thanks, I will look into that. The very first place I visited was the basic tools section. Got some great ideas and loved the idea of using river rock as a dolly. Also the leaf spring slappers are on my list. Thanks for all the basic info. The little things are often never stated. I will spend the evening reading and watching.
__________________
Austin Hunt
|
|
#8
10-25-2012, 04:50 PM
|
|||
|
|||
|
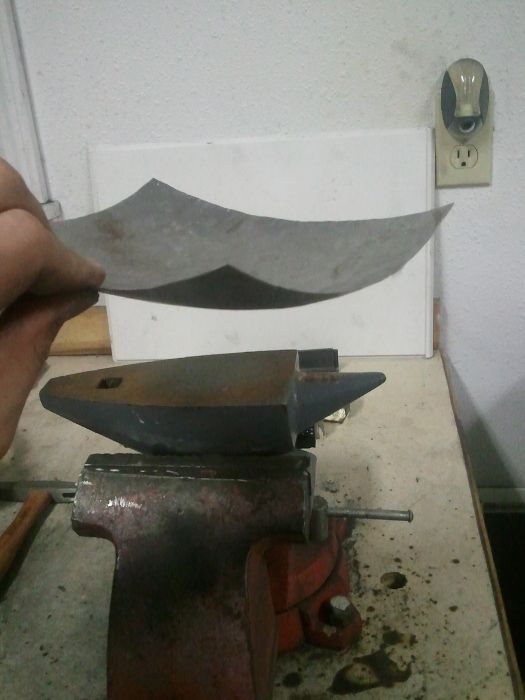
This is my first attempt. I used a pair of needle nose pliers as a puckering iron, and a framing hammer to shrink the edges. Ugly, but it's to be expected from hammer that has seen better days and a toy anvil.
__________________
Austin Hunt
|
|
#9
10-27-2012, 10:31 AM
|
|||
|
|||
|
Nice work. I think it's obvious you understand the principles here. Only ugly if it's not finished.
As for the old framing hammer, reshape and polish the striking surface. If it's one of the heavy framing hammers, ditch it for finishing as soon as you can, a lighter hammer will bounce better, save your arm, and be better able to "finesse" with. If it is a heavy framer, round the striking end and use it for heavy sinking. Or save it to build a shop addition....
__________________
Mark from Illinois
|
|
#10
10-28-2012, 12:27 AM
|
|||
|
|||
|
weltoride - Thanks. Yes it is ugly but I'm proud of it for a first try.
I taped half a plastic ball to a drill and gave my beat up hammer a nice radius as you suggested. It will be good for hollowing I think. I won't be building an addition as its not my house and I'm a poor college student! Here are some more pics after using a polished pry par for a slapper. Keep in mind this was done with improvised tools. 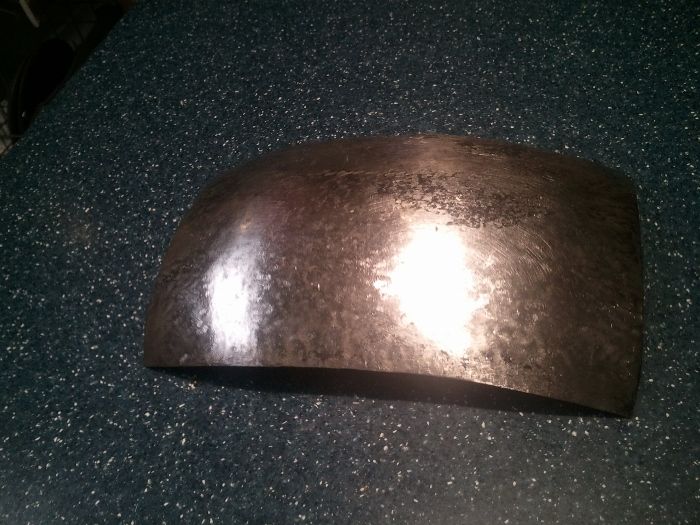 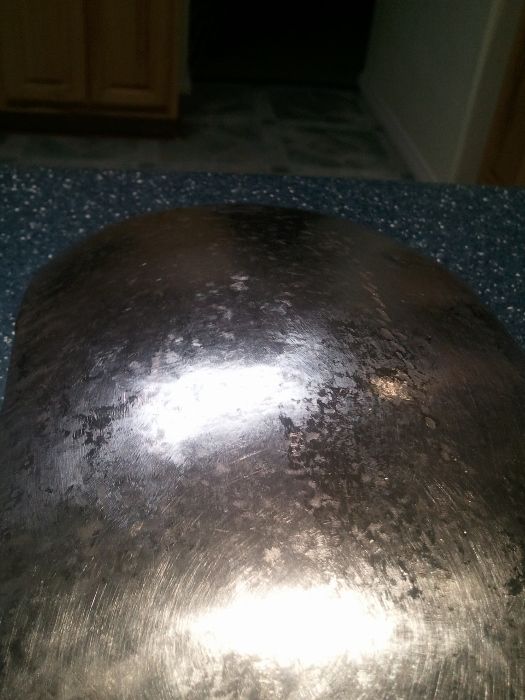
__________________
Austin Hunt Last edited by austinhunt; 10-28-2012 at 12:32 AM. Reason: typo
|
 |
|
|


 Linear Mode

